Overly I am very positive to see what impact AI has on work efficiency and other aspects of our life’s. But as with every technological revolution there are super fast miss-use, fraud and other soft crimes around the corner that are only possible because of this new awesome new technology. This use-case is of course a minority but I find it also important to draw our attention towards it, as in the news and discussions there is mostly only hype and over-exaggeration on what AI will change for good presented.
So I saw an ad on social media, that was clearly an Ai generated image from an elderly man that claims his leather shops is about to close and he is selling now his last hand made pieces. This is a very nice and heartbreaking story – but it is completely made up.
The shop where the grandpa like old man is selling his products is a simply standard theme shopify store that was quickly built together. The images are clearly all created from AI and Hermann is not existing in reality.
Furthermore the product are prized really really high around a couple of 100 euros each. But they somehow don’t look like hand made leather product from Germany but rather like factory stuff from Asia.
Researching a bit I found lots of complaints about the shop and also a official warning from an internet watch no-profit from Austria. But in reality some people seem to really fell for this fake shop and fake narrative which turn out to be just one more of those drop shipping shops selling rubbish from China.
Of course there is no impress, also the domain was acquired using an anonymisier tool, so there are no traces to the real operator of this little scam venture, who will probably get away with it and make some extra money.
Since I got my hands on the first programmable calculator I was hooked into creating games. Later in my teenage years when I learned programming I created some basic games with the Windows API and Visual Basic. Since my career took a different path into marketing an media I always had a side eye on the gaming industry and it was for some time my dream to work in the industry. Never happened – now I am not disappointed but I am still very interested in gaming and also in creating my own games.
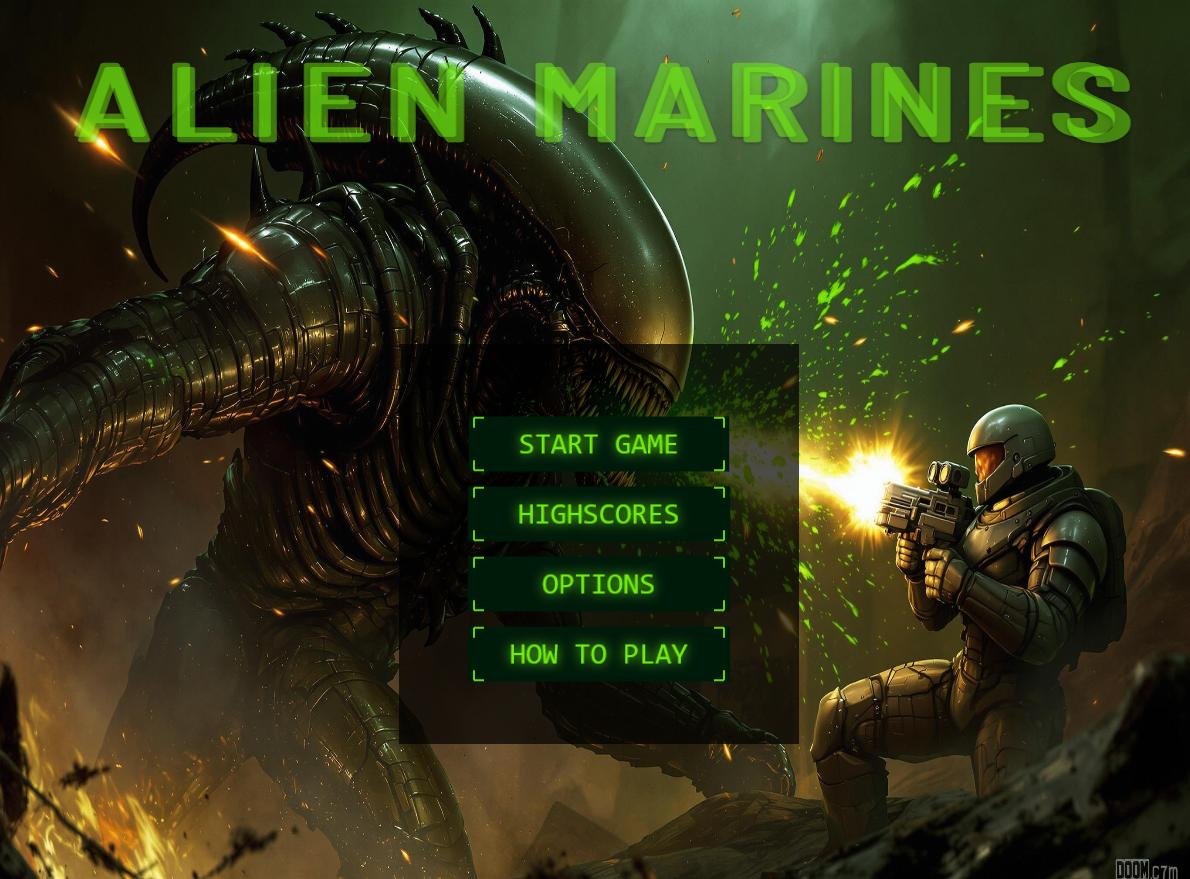
My programming skill in advanced languages like C were never there to be able to create a “real” game so this never happened. But now with the rise of all sort of AI tools: in code generation, in art work, in music & sound I saw a good foundation to get something into the world with this new tool sets. So here is my experience report of 3 months working as a side project on a little 2d retro shooter game with helping hands from AI.
The basic idea
I am big fan of the original Alien movies and was always kinda disappointed what not so great games were released under the franchise over the years. So I wanted to create something in this scifi sphere. Some years ago I create a simple game using the web/javascript game engine phaser, so this time again I was planning to create a web based game with this libary.
The game should be not to complicated, having a retro touch from the early 90s games and a easy to play top down shooter. I also let elements of the Doom and Quake games inspire me for certain aspects (e.g. the player sprite is based on a Doom guy sprite and the music is very Quake 2 inspired). And the name of it should be: Alien Marines.
Code
For coding the game I heavily relied on the AI driven IDE Cursor. This is at the moment the best product in this category in the market. I also tried competitor tools like Windsurf, Zendcoder, PearAI and others but from my experience Cursor is still the #1. There are some controversies regarding the pricing and regulation of API calls but putting this things aside, it just works best. The start was simply this prompt:
create a project overview for a 2d game using the phaser html5 game engine. the game should have the look & feel from vampire survivors but should take place in the alien franchise. the player is a marine soldier, the enemies are xenomorphes and the environment is a fictional space ships with rooms and passages.
create the project outline first and give an overview of the next steps and the necessary files, folder to create
The agent mode of Cursor is here really helpful and it can create a small to mid sized code project at once for you. Sounds nice at first, but I really had my problems with the build tools and libary usage so that I decided to start from scratch again with a plain HTML file and the javascript game code. I learned coding in the early web ages so I feel way more comfortable with simple files than a huge tool chain.
Coding larger projects with AI is often running smooth but when the code base grows the problems start to arise. I wrote already some notes on this topic: AI software development – recap from a non dev person. Working with on a bigger project makes that all worse. From an LLm perspective I mostly used Claude Sonet 3.5 and since the release version 3.7. The model from Anthropic are commonly graded as the best for coding and I can just confirm this. For cost reasons I also used DeepSeek R1 but had here serious problems with hallucinations of the model. The code base was around 5k lines of code at that time and the model constantly used variables or functions that weren’t there. This is really frustrating after some time and requires a lot of hands on bug fixing.
Another issue I ran into all the time is rooted in the phaser libary which recently updated their interfaces to use emitter and particles effects. The LLMs state of knowledge was some version before and I always got not functioning code here. Again this was to fix manually. Besides having really speed improvements with AI generated code I also needed to spend hours of fixing bugs or refactor parts manually. Also reviewing the code quality, it is not the best I have to say. There is not always the same principles used in naming or processes that probably would make maintenance in a team setting more difficult.
In summary the speed and efficiency improvement using and AI enabled IDE versus coding fully yourself with help of stackoverflow or other online help resources is incredible. Unfortunately I haven’t tracked the time I spent into building the game but just the fact that I am not game developer and has not deeply worked with the phaser libary before is a proof that AI works here. As a complete developer newbie I am certain something comparable is not possible as it was from time to time required to fix bugs and refactor parts.
Player and enemy sprites
Working on sprites was a bit tricky as I have never done that before. I used Photoshop and later libresprite and for the start I re-used some sprite parts from older alien games and from Doom. For example this is my player sprite sheet:
or one based on a SNES version of a facehugger:
Of course I wanted to also add my own twist in terms of xenomorph creates and also don’t want to be sued by a big movie studio 🙂 So I started to work with different AI image generator to create my own xeno creatures. I tried out flux and ideogram but that was not working at all. So I switched to Dall-E 3 and the results turned out really good. But there were some steps need to get from a creature to a sprite sheet of it:
Create a xeno creature sideview in front of a white background so that you can easily work with in the further steps
Chose on image and put it into a image2video model to create a movement sequence. I used minimax and kling-video for this.
Chose one video and create keyframes of it
Chose some keyframe and put together a sort of animation and add manually effects (acid in my case)
The process sounds simple but I sometime created 30 to 40 base images from the creature just to have on to work with further. In the animation this was even worth because the models consequently ignored my prompts to make the creature just walk from one end of the screen to the other one. Like this buddy here:
After quite some time and a lot of resources spent on generating images and video the final result is a sprite sheet like this one here ready to be used in the game:
Some more examples of the creatures I created but not used:
Background Images
In my game I am not using a tile based level design but just one big background image. Doing so it was quite simple to get fitting background images out of AI image generators. This time choosing flux as model was the right way and the results were pretty good. The prompting this time war not too complicated but anyhow I needed around 5-10 runs to get a usable image from the model back. Sometime the model just messes up dimension or makes the outline walls too big.
Here is an example prompt:
digital art. create a game floor graphic for a top down 2d game in a science fiction xenomorph scenario.
Dark futuristic alien planet with organic structures like trees and plants . dark colors, top view, place parts of a dead xenomorph skeleton in the middle
And some example background images:
Hud and user interface
An area were AI image generation was not that helpful was with creating elements for the user interface. Games usually have nice menus and also the current player stats are displayed normally in a nice way. The easiest but not the most appealing way is to rely on text, which I did in version 1. Later on I wanted to create a graphical HUD for the main game. Creating these things with AI is really hard because there is no sign of any consistency and even with tools like LoRa you can’t do that for user interface elements. So you get a bunch of examples and you need to go back to good old Photoshop and put things like a puzzle together. Some UI examples from the AI:
The first image although made it into the game and is the base for the main player HUD interface at the top of the game.
Mood Images
An area where the AI model really can show their strength is with mood images. Here we are not super strict with positioning, overall layout or specific elements of the image and we can tolerate the creative effusion of the models. Again here I used flux and the only problem I encounter here was that when prompting for scenes with the marine and xenomorph enemies sometimes also the marine gets xeno elements like big teeth or a tail. Overall I was super happy with the AI output here. Some examples that didn’t made it into the game (and you can probably easy spot why):
and some that did:
Music
For the soundtrack I was heavily inspired by the heavy metal soundtrack of Quake2. Also here I used AI tools to create the music for the game, mainly https://www.udio.com/ and https://suno.com. From an output quality perspective I must say that only songs created by suno made it into the game. The prompt input was very limited (only 200 chars) and so it was not super easy to define the style and also the context of the songs. Sometimes the produced lyrics sound a little odd but I think that’s OK for such kinda game. Here is an example song in a classic heavy metal style:
and a more modern one with hard dubstep like beats:
I used for the soundtrack around 15 tracks in a style mixture of classic 80s heavy metal, 2000s cross over, heavy dubstep styles all with the topic of fighting xenomorphs in space.
For the sound/sfx I didn’t use AI tools at all because I simply couldn’t find useful ones, so I relied here heavily on free resources from pixbay.
Progress
As I mentioned before, I cannot really determine how many hours I put into this project but I made a lot of progress in February this year where my business allocation wasn’t that high this time.
I think the progress of the game is clearly visible. A version from early February is also available here.
My recap
My recap of this side project is that I was really hooked into the process most of the time (especially starting with February 2025) and the current output wouldn’t been possible for me to achieve without the use of AI. First of all I am no game developer, I am not graphic designer, musician and game designer but AI combined with a lot of trial & error and playing the game myself for hours made a nice product possible. I hope someone enjoys playing it in the end.
Some people might argue that I am not a real game designer/developer and the game is not “my” game at all – there is some truth behind this as of course I heavily used AI to achieve the output but at any point of time I was controlling and steering all the process and the produced product. I think it is an evident demonstration of what is today possible with AI tools and how the process of crafting something is speeded up tremendously and also opened up to more and more people.
I will publish the game also on itch.io for gaming insider feedback and also will continue to work on it as a side project.
If you involved in AI you probable stumbled upon big promises that everyone can now create its own SaaS business with not even knowing how to write a single line of code. The tools that should make this promise come true are integrated online developments environments (that have been existing before the big generative AI wave) supercharged now with AI code generation powers. The big difference to github copilot, cursor or windsurf is that those tools run a complete node based dev environment on their servers that you can easily access through a web interface and place your code project there.
The currently most popular player in this field are:
https://v0.dev
https://lovable.dev/
https://bolt.new/
https://replit.com/
How do they work…
The layout and base functions of the tools are very similar: you have a chat window to communicated with the AI agent and another set of windows to monitor the code and the rendered output of it. So far I see it all of them use a node.js tech stack with different frameworks put on top of it. Here are some screen shots of the main interfaces from replit, v0 and bolt.new:
From the first impression v0 and replit seem to be more sophisticated in terms of the UI and also the functionality. But lets bring them all to a simple test…
A simple project to test the capabilities of the tools
For my consulting business I created an openAI assistant that helps my client to deal and analyze marketing trends. Now I wanted a simple web interface that queries the assistant via the openAI API and give the answer in a simple chat interface back. So this is really not a big deal I had thought but I spent hours and (spoiler alert) not one tool was able to complete the task.
The start was indeed quite promising as I got a first app scaffolding back from each tool when prompting my demand:
create a interface for the openai assistant api. the user can send messages to a defined assistant and it answers. the conversation between user and assistant should be visualized like in typical ai applications. the user can create variuous chat threads that are then stored and visualized in the sidebar. also add authentication for the user using superbase functions.
When we speak about UI and the looks, here v0 clearly wins as it creates the best looking interface. All of the tools rely on tailwind.css.
Problems, problems, problems
I connected a simple supabase database for simple user authentication and persistent features and then the problems started: v0 was not able to remember its own proposed database schema and made from that point ongoing mistakes with wrong columns names etc.
All of the tools exposed my openAI API to the frontend in a first version. I needed to explicit tell it to use a server proxy for the API requests and not store the key in frontend code. This is quite annoying and can be also dangerous for a tech newbie. Luckily openAI itself blocks those request by default.
What do I to here? It seems like v0 is not aware what its own capabilities are and asks the user to install some packages via npm.
In the end I spent around 2h and 10+ revisions with the task on each tool and try to get it working. But: none of it even got somewhere close to the end. I repeat: NONE. None of it was able to correctly query the openAI assistant API to even submit the user request. This is really a bummer and to prove the semi talented non dev people can do it better I coded the needed piece myself in a 200line of code PHP script that works just fine.
My recap
So to sum up, my first impression of those magical tools is disillusioned as they just don’t deliver. I don’t know if my test example was so complicated but I think it was definitely not. A solution in just a few lines of old school scripting language brought me further as investing my time in those hyped tools. Although I see already a lot of those micro SaaS popping up that surely have been mostly created by non dev people with those tools.
[Update 26.02.]
I decided to take a 2nd attempt in trying to get my project with one of the AI code generators to work. This time I took my working php script as a base and just asked the AI to rewrite it. Here is the prompt I gave to v0:
i wrote a simple php script to query the openai assistant api. take the code as base and create a new project in node/nextjs doing the same functionality. create a server and a frontend part. do not save the api keys in frontend code but use a server code to query the api. reuse the logic in the process.php for the server code and rewrite in in js/ts
implement a new color scheme based on your standard colors
As you can see I explicit asked to write frontend and backend code separated which was this time also well performed. My openAI were not exposed in public like the first try as well. After 3 revision I got a working solution. This is a big surprise to be honest as with my first approach I just stopped completely pissed at revision 20+.
I am a non deep tech person. But I used to learn programming at university and I wrote code as part of my job in my early years. So I know how to code, how to set up a team based software dev project etc. With the progress of my career I shifted more and more in management roles and of course you don’t do anything code related there anymore. So it must have been somewhen around 2016 when I wrote my last line of code – until 2024.
First steps in 2023…
But playing around with all sort of AI technology let me again dive into the field of software development and I dig into writing code again. Of course with the help of AI, which actually means that AI wrote the code and I checked for functionality and output. My first steps with that approach was late 2023 with chatGPT and the output was not quite satisfying. Basically the code produced by the AI was very ugly and just worked after manual bug-fixing. I was not very impressed about AI in software dev back then.
But as the model improved it really also progressed the application in software generation. Comparing the quality of the model from end 2023 to mid 2024 is a huge step forward. I used now again chatGPT but as well Claude. The generated code was not the best in class, but working and additional conversations with the AI did actual work quite smooth to further evolve the code and create bigger projects. Claude Sonnet 3.5 especially is really the leading model here. I was able to create with it simple tools for my consulting business like a QR code generator, a funnel generator and other small single page concepts.
Going a step further: AI first IDE
For this small tiny projects AI generated code works pretty well. I also started to use cursor – an AI first integrated development environment based on VSCode. This make the entire process of querying the AI and put the results back into the code base super smooth. This is at the moment the approach that works the best. There are additional tools, where you can create prompts based on design inputs, which you can then put into Cursor or an AI interface to generate code.
The downside
Beside being really surprise from the progress of AI based software development, there are also major downsides I also experience myself. First of all, you don’t know the code, as it is not yours but from the AI generated. To change minor things, which would normally a 1 minute tasks take longer or you just ask again the AI. This can be really problematic when second you run into the typical problem of a bug, that the AI is not able to fix. This is a condition that you will sooner or later experience and the AI is not helpful any more. Means you have to dig into a code, that you hardly know, and fix a bug manually. Software dev probably know this situation when there is the need to fix a bug in someone else’s code and there is no or very little focus on code quality or style. So this can be very painful and time consuming.
So it is in my opinion super important that you actually have coding skills to overcome to above described problem situation and work properly with AI generated code.
This is a collection of my so far best result images I used to create using GenAI tools. Most of the examples you will see below have been created using Dall-E or Flux. I also included the prompt, so that you can copy the image if you would like to re-create them.
Create an image of a figure wearing a dark, gothic costume with significant, stylistic elements. The figure's face is painted to resemble a skull, with deep black eye sockets and a white base, while the lips appear smudged. The most striking features are the large, curled ram horns on top of the head, adorned with an elaborate chain headpiece that drapes over the forehead and sides. Chains, varying in size and style, hang around the neck creating layers. The costume includes
A hyper-realistic and detailed 3D render in 8K resolution. The scene depicts a massive moon dominating the left side of the frame, casting a dramatic glow. The ground is covered with thick smoke and raging fires, creating a sense of chaos and destruction. At the center-top of the frame, a futuristic satellite hovers in space, emitting a powerful laser beam aimed at the ground below. The atmosphere is dark and apocalyptic, with intricate textures and dynamic lighting. The composition is in a cinematic 9:16 aspect ratio
A fierce Viking warrior in a battle ready pose, holding his sword aloft with intense focus. His face is twisted in a fierce expression, beads of sweat and spit at the corners of his mouth. He wears rugged fur clothing, with wild, untamed hair and a thick beard. The surrounding environment is harsh, with dark clouds swirling above, crashing waves, and jagged rocks in the distance. Dust and mist fill the air, enhancing the atmosphere of tension and ferocity. His posture is powerful and tense, ready for the coming battle
A menacing figure of Krampus, depicted with long, twisted horns and a grotesque, demonic face. His body is covered in dark, shaggy fur, and he has one human foot and one cloven hoof. Krampus carries chains and birch rods, symbolizing his role in punishing naughty children. The background is a creepy, wintery landscape, with snow-covered trees and a dark, ominous sky. The overall atmosphere is eerie and foreboding, capturing the essence of this mythical creature.
A massive great white shark with its jaws wide open, and hanging from its terrifying teeth is a wooden sign. The sign reads, 'If you can read this, it's too late' in bold, weathered letters, giving a chilling sense of impending doom. The murky water surrounds the shark, with dark, shadowy figures lurking just below the surface, amplifying the tension. The shark’s massive mouth is poised to close, and the sign adds a sense of finality and danger
A comet impact on Earth, viewed from the ground. T-Rex in the immediate foreground and a pterosaur crashing down. More dramatic cinema action. Dramatic sky in deep orange and red. Impact creates an exploding fireball. Massive shockwave. Trees uprooted. Debris flying. Huge plume of smoke and dust. Ground shaking violently. Sparks and glowing debris flying in all directions. Intense and majestic.
A fort gt, blue with aluminum wheels, Carbon fiber rear wings. Dynamic curves and aggressive stance feature intricate aerodynamic details. The car is positioned in perspective, highlighting sculpted lines and jewel-like headlights. Floating around it, precise sketches show the design process, with annotations and measurements. Against pristine white background, subtle color accent the logo, grille
Create an image of a bas-relief featuring two figures, one demonic and one angelic, symbolizing the contrast between good and evil. The demonic figure is on the left and has striking red and black tones. The skin is dark red and adorned with intricate black markings that suggest sinuous scales or armor. This figure's wings rise dramatically, feathers detailed and dark, matching the horns that curl from his forehead.
RAW hyper-realistic photo, post-apocalyptic urban street at sunset. A large sunset and a slight red cloudy sun below it, above the view. The road was flooded. Abandoned buildings lined the streets, and power lines stretched overhead, adding to the atmosphere of silence. Debris floats on the surface of the water, hinting at the turmoil of the past. Despite the destruction, there is a haunting beauty of how nature reclaims this urban environment under a dramatic sunset. UHD
"A dark, medieval castle set atop a rugged cliff, surrounded by a gloomy and misty atmosphere. The castle has multiple tall spires and intricate gothic architecture. A winding, narrow stone pathway leads up to the entrance, with moss-covered stones and overgrown roots on the sides. A tall waterfall cascades dramatically down the cliff beside the castle, merging with the fog and mist in the background.
Create; "Detailed black and white pencil drawing illustration of a fierce mid-race Spartan warrior, wearing a traditional Greek helmet with a plume, carrying a large round shield and a sword. His muscular build and flowing cape are visible, and his armor includes protective arm and leg gear The background is minimal, with dust and energy trails emphasizing his powerful movement. The style is highly detailed, strongly contrasting the intensity and power of an ancient warrior.
Create a moody, high-contrast black-and-white illustration of a man sitting alone in a dimly lit room. The setting should feature venetian blinds casting sharp, striped shadows across his face and body, highlighting his silhouette against the darkness. Position the man seated in a leather armchair, with a contemplative pose, partially obscured by shadow. The scene should evoke a film noir atmosphere with strong, dramatic lighting that accentuates the blinds and adds depth to the scene
A realistic, detailed, and accurate HDR 3D render of an ancient ocean ecosystem. The main subject of the image is the seafloor, where Dickinsonia is visible. Anomalocaris is seen hunting nearby, while other small primitive marine life forms are visible in the background. The image is slightly hazy, with dim sunlight filtering through, creating an eerie, ancient atmosphere.
A very next step when playing around with generative AI tools, is to make a video from a given image. In my case I wanted to animate the above image of mysself (AI generated with Flux/LoRA) in a natural way to make me speak out.
My first try out where with RunwayML – unfortunately only Model #2, not the newer version 3. The results are not the great: the movement is not natural mostly weird and also the transition in the face (morphing) looks rather spooky. So this first try was failure.
Try #2 with minimax video
A very new image2video model is minimax. You can easy access it via fal.ai. The prompt was very simply, just instruct to make me speak out and show some natural gestures. The output is way better then the one from RunwayML. It looks smoother and more natural. I wouldn’t say it is truely realistic but it must be around 90% acurate.
In the previous post I explained how to train Flux/LoRA to create images of yourself. This is a quite straightforward process and after that we can create via prompts the images we want to. In my case I did my first try outs with some business portraits for myself. The results a good, sometimes a bit to blurry and smoothened out. But there is an issue that the Flux AI tends to add you at least a 2nd time into the picture if you place yourself into a typical scenery with more then just 1 person. I also found a simple solution to overcome this. Here are my example prompts and the outcomes:
Professional business portrait of erich wearing a dark grey suite, sitting confidently at a modern office desk. Background shows a contemporary office with glass windows and city views. Well-lit with soft, natural light, highlighting a friendly, approachable smile, wearing a formal suit.
Professional business portrait of erich, standing in a modern office meeting room with a table and screen in the background. Wearing business attire with a confident, relaxed posture, arms crossed and smiling warmly. Soft, professional lighting enhances a welcoming expression.
Professional portrait of erich, seated behind a modern executive desk, surrounded by minimalistic office decor like a laptop, notebook, and pen holder. Well-lit room with large windows and subtle artwork in the background. Dressed in a formal suit or business casual, with a focused, thoughtful expression.
Professional yet relaxed business portrait of erich, standing in a collaborative office space with colleagues visible in the background, blurred slightly. Wearing business casual attire, arms relaxed, with a warm, approachable expression. Modern office setting with plants and glass walls, lit with natural light.
Here we have the case, that I have been put a 2nd time into the picture.
Professional business portrait of erich, caught in a natural conversation with a colleague in a modern office lounge area. Wearing business attire, seated on a stylish office sofa with hands gesturing slightly as if explaining something. Background features office decor with plants, well-lit with ambient lighting.
How to overcome the multiple images of yourself in scenes
This is actually quite simple, you just need to tell the AI via prompt that only one person is yourself and the others should be given random faces:
erich is sitting in a high class restaurant and having dinner with a lovely woman wearing an elegant black dress. erich is smiling into the camera. he is wearing smart casual clothings. in the background we see the typical scenery of a restaurant with tables, people etc. only the person sitting on the table with the woman is erich. add random faces to all the others
The first AI apps on the mobile I remember were some fun apps creating from an given image of you, different scenario pictures like a funny background. The makers charged quite some money for like 5 custom images. However with Flux LoRA there is a even better outcome for less money possible.
Flux is the image generator model by German AI company Black-Forest-Labs and is at the moment the hottest and best image generator for photo realistic images. The image generator itself can be easily for free on their website.
To achieve custom pictures of us we need to go a step further and train the model. This is not complicated and cost only 2$. I use the AI workspace fal.ai for this where you can work with many different model – and also Flux and Flux SoRA.
You will see the form pictured above. Add face shots, selfies, close up pictures of you into the uploader. I used about 25 pictures of me. Then select a “Trigger Word” – to reference the training data in your future prompt. I simply use my name “Erich” as the trigger word. Then let the training start – it will last around 1 minute to finish.
Step 2: Run the model with your trigger word
To create an image prompt based on the trained data with the Flux SoRA model simply klick on the Run button of the training form:
Enter your prompt referencing the “Trigger word” you have set before and let the magic happen. I generated some examples using very simple 1 line prompts:
The business picture is really great and it looks very much like me when in use in small scale. When getting closer you can see blurry areas somehow. The 2nd picture was to put me to Oktoberfest with interesting result being put twice into the picture 🙂 The black t-shirt and the yellow backbag is actually taken from one of my training pictures. Overall I am quite happy with the outcomes and with some more detailed prompts, you definitely will get even better results. Total costs ~2$.
Advanced prompt examples
Here are some more examples I generated today with a more advanced promoting:
erich is captured mid-speech. His expressive face, adorned with a salt-and-pepper beard and mustache, is animated as he gestures with his left hand. He is holding a black microphone in his right hand, speaking passionately. The man is wearing a dark, textured shirt with unique, slightly shimmering patterns, and a green lanyard with multiple badges and logos hanging around his neck. The lanyard features the "Autodesk" and "V-Ray" logos prominently. Behind him, there is a blurred background with a white banner containing logos and text, indicating a professional or conference setting. The overall scene is vibrant and dynamic, capturing the energy of a live presentation.
This is a summary of my progress with AI image generators over the past months. From first try outs with creating new movie posters to very advanced prompting showing really cool results.
Alternative movie posters
Those are my first try-outs with AI image generators and also already over 1 year old. I used Dall-E for the generating (except the 2 alien pic – those came from Flux. Dall-E still has huge problems putting text 1:1 into the image, as you can clearly see. Flux is comparable great at this task.
Comic strips
Pixel Art
Advanced prompting results
This are the my best images and most advanced prompts I have been using in the past. Most images are generated with Dall-E 3 and Flux1.0. The more realistic looking image have been generated with flux, which as at the moment for me the reference when it comes to image generating. If you need not the super realistic look, Dall-E will also do. Plus: those 2 you can still be used for free.
Disclaimer: This is a new version of my RSS Feed Turorial from 2008, as it still gets a decent amount of traffic from Google. Hope it still helps 15 years later.
Einen RSS Feed kann man kinderleicht für seine dynamische Website, zum Beispiel ein News Script, erstellen. Dafür ist nur die Kenntnis vom Aufbau einer RSS Datei plus eine einfache Datenbankabfrage notwendig. Hier wird gezeigt wie man einen solchen dynamische generierten RSS Feed manuell zusammenstellt.
Einleitung
Als Vorwissen für dieses Tutorial benötigt man Kenntnisse in php und mysql. Ziel ist es ein kleines php Script zu schreiben, das auf Basis von Daten aus einer mysql o.ä. Datenbank dynamisch einen RSS Feed generiert.
Zuerst muss man sich entscheiden auf welchen RSS Standard man zurück greifen will. Es gibt diverse Standards, die man auch gängig bei anderen Seiten finden kann – zB. RSS0.91, RSS1.0 und RSS2.0 (mehr dazu hier). Wir werden in diesem Tutorial einen RSS2.0 Feed erstellen.
Dokument Definition
Als erstes erstellen wir in einem Editor eine leere Datei und fügen folgenden Header Code in die ersten Zeilen ein:
Hier wird erstmal definiert um was für ein Dokument es sich hier eigentlich handelt bzw. die XML DTD dazu bestimmt. Die Tags “<rss>” und ” <channel>” sind die Basis Element eines RSS Feeds. Da wir einen Dynamischen RSS Feed haben wollen und die erstellende Datei eine php Script beinhaltet, muss die erste Zeile, die XML Definition, mit einem echo ausgegeben werden, da sonst der php Interpretor auf das “?” mit einem Parse Error reagiert.
<?xml version="1.0" encoding="ISO-8859-1" ?>"
Weiters muss hier dem Browser der content type mitgeteilt werden, da dieser sonst den Inhalt als Html und icht als xml ausgibt. Die ganze veränderte Zeile sieht dann wie folgt aus:
Nachdem wir nun die Stammelemente plus die xml Definition erstellt haben machen wir uns an die Meta Daten des Feeds. Die sehen bei RSS2.0 folgendermaßen aussehen und sind meistens statisch. Die Elemente hier sind selbsterklärend. Beim Tag “lastBuildDate” könnte man zum Beispiel mit <?php $now = time(); echo $now; ?> zur Script Laufzeit das aktuelle Datum einsetzen.
<title>Website name</title>
<link>http://www.beispiel.de</link>
<description>Beschreibung von Website</description>
<language>de-de</language>
<pubDate>Datum der Erstellung</pubDate>
<lastBuildDate>Datum des letzten Outputs, in vielen Fällen die Ausführzeit des Scriptes</lastBuildDate>
<docs>http://www.beispiel.to/rss.php</docs>
<generator>Rss Feed Engine</generator>
<managingEditor>info@beispiel.de</managingEditor>
<webMaster>info@beispiel.de</webMaster>
Elemente
Nun da die Meta Elemente ausgefüllt sind ist der nächste Schritt die einzelnen News Elemente des z.B. News Scipts in RSS konforme Daten zu konvertieren. Die Struktur eines Items sieht dabei so aus. Ein Feed kann beliebig viele Items beinhalten aber es macht Sinn diese auf ca. 10-20 Elemente zu beschränken.
<item>
<title>Beispiel Titel</title>
<link>http://www.beispiel.de/link</link>
<description>Beispiel Beschreibung, Text, Bilder etc. Die Description kann auch einen Excerpt (Auszug) des vollen Beitragtextes enthalten.</description>
<pubDate>Datum der Veröffentlichung des Beitrags</pubDate>
<guid>http://www.beispiel.de/link</guid>
</item>
Dieses Template eines Items füllen wir nun mittels einer Datenbank Abfrage o.ä. mit Daten. Der dazu passende Code könnte z.B. so aussehen:
<?php require('mysql_connect.php');
$SqlSelect = "SELECT link, pic, titel, text FROM news LIMIT 0,20";
$result = mysql_query($SqlSelect);
if (!$result) { die('Invalid query: ' . mysql_error()); }
while ($row = mysql_fetch_assoc($result)) { ?>
<item>
<title><?php echo $row['titel']; ?></title>
<link> <?php echo $row['link']; ?> </link>
<pubDate> Wenn vorhanden Timestamp des Beitrages, ansonst einfach weg lassen </pubDate>
<description> <?php echo "<img src=\"".$row['pic']."\"></img></a>"; ?> <?php echo $row['text']; ?> </description>
</item> <?php }
mysql_free_result($result);
mysql_close($dbh);
?>
Zum Schluss schließen wir noch die beiden Stammelemente channel und rss am Ende des Dokumentes.
</channel> </rss>
Um jetzt den erstellten Dynamischen RSS Feed auf der Hauptseite einzufügen und ihn für die Browser erkennbar zu machen, muss man foolgende Zeile in den Kopf der Hauptseite schreiben:
<?php header("Content-type: text/xml");
echo "<?xml version=\"1.0\" encoding=\"ISO-8859-1\" ?>"; ?>
<rss version="2.0">
<channel>
<title>Website name</title>
<link>http://www.beispiel.de</link>
<description>Beschreibung von Website</description>
<language>de-de</language>
<pubDate>Datum der Erstellung</pubDate>
<lastBuildDate>Datum des letzten Outputs, in vielen Fällen die Ausführzeit des Scriptes</lastBuildDate>
<docs>http://www.beispiel.to/rss.php</docs>
<generator>Rss Feed Engine</generator>
<managingEditor>info@beispiel.de</managingEditor>
<webMaster>info@beispiel.de</webMaster>
<?php
require('mysql_connect.php');
$SqlSelect = "SELECT link, pic, titel, text FROM news LIMIT 0,20";
$result = mysql_query($SqlSelect);
if (!$result) { die('Invalid query: ' . mysql_error()); }
while ($row = mysql_fetch_assoc($result)) {
?>
<item>
<title><?php echo $row['titel']; ?></title>
<link>
<?php echo $row['link']; ?>
</link>
<pubDate>
Wenn vorhanden Timestamp des Beitrages, ansonst einfach weg lassen
</pubDate>
<description>
<?php echo "<img src=\"".$row['pic']."\"></img></a>"; ?>
<?php echo $row['text']; ?>
</description>
</item>
<?php
}
mysql_free_result($result);
mysql_close($dbh);
?>
</channel>
</rss>
We use cookies to ensure that we give you the best experience on our website. If you continue to use this site we will assume that you are happy with it.OkPrivacy policy